Connecting your iPad to your projector is simple. Here’s an easy how-to-guide on the four main ways to connect.
Connect directly through cables
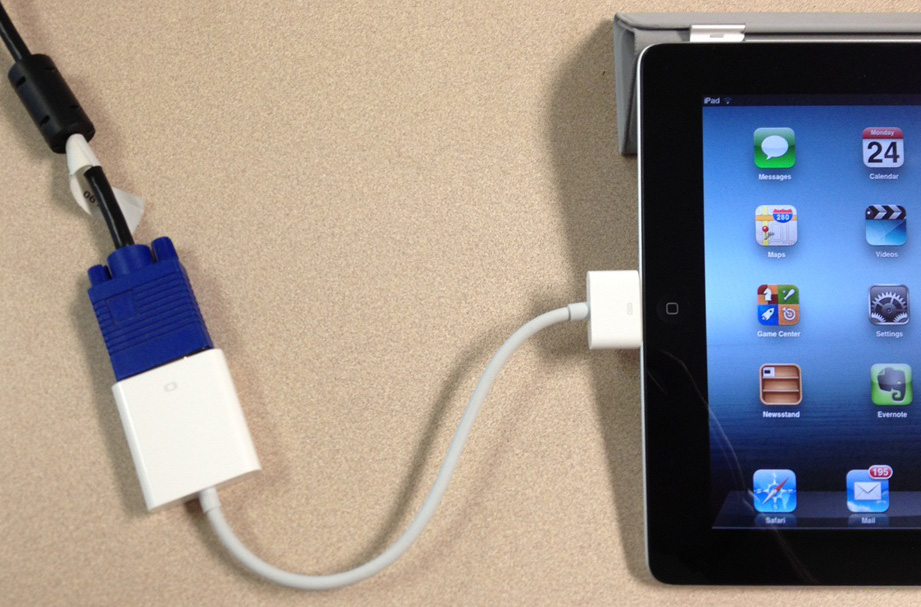
Connect your iPad to your projector using the right cables. The first step is to pick the transmit mode.
VGA vs. HDMI
If you have an older projector you may only have a VGA connection. Newer projectors will have both the VGA and HDMI connections. The biggest difference between VGA and HDMI is with sound. Using HDMI means everything is put through the cable, including the sound or music in your presentation. If your projector doesn’t have speakers, you won’t hear any sound using an HDMI cable. You will have to go back to VGA. No shame in that.
Choose the right Apple cable
Depending on your model and whether you are doing VGA or HDMI, you’ll need a different cable:
- Apple Dock Connector to VGA Adapter: iPad models 1, 2 and 3
- HDMI Apple Digital AV Adapter: iPad models 1, 2 and 3
- Lightning to VGA Adapter: iPad models 4th generation and up
- Lightning Digital AV Adapter: iPad models 4th generation and up
Read more about projector cables and connections: How to connect your projector to a Mac laptop
Set-up the connection
- Find your VGA or HDMI socket on the projector. The VGA slot resembles the same plug in used with your old desktop while the HDMI cable has a narrower plug. Older models may not have the HDMI slot.
- Plug the remaining VGA or HMDI end into the Apple connector dock or adaptor.
- Plug the apple adaptor or dock into the charging socket on the iPad located below the home button.
- If you are using VGA, plug computer speakers into the headphone jack on the iPad for better sound. If you are using HDMI, the sound will be fed through your projector.
- The screen should automatically mirror what is showing in the iPad. If not, use the projector remote and hit either the SOURCE or COMPUTER button until the projector finds the source and displays the iPad picture on screen.
Connecting through Apple TV
If you prefer not to use any cords and create a wireless connection with your iPad, try the Apple TV connection combined with an HDMI cable.
Note: Your projector might not have HDMI input. If that’s the case, you’ll need an HDMI to VGA adapter like the Kanex ATVPRO
Set up the connection
- Plug the main cable HDMI lead connect into the Apple TV
- Plug other HDMI lead into back of the projector.
Configure the Apple TV for its network
- Use a wireless network to connect, Apple TV helps you select and configure your network connection.
- Select your network from the list shown (or enter the network name if it is hidden). Choose the wired Ethernet network and Apple TV automatically detects your network. Choose wireless network, Apple TV helps you select and configure your network connection.
- Enter you password
- If you don’t connect using DHCP, you may have to enter your IP address, subnet mask, router, and DNS addresses.
- Tap Enter.
Configure the iPad
- With all four fingers, lift up on the iPad screen to reveal Control Center.
- Move your fingers across the screen to reveal the Control Center menu.
 Scroll across and click on the screen icon (farthest button on the right panel).
- Tap to choose Apple TV.
- Once Apple TV is chosen, tap MENU.
- Make sure mirroring has been turned on.
The signal is sent from the iPad wirelessly to Apple TV and then through to the projector.
Connecting through AirPlay
 You can use the AirPlay app to stream music, photos, and video wireless to Apple TV from the iPad or any other device on the same WiFi network.
Set up Airplay:
- With all four fingers, lift up on the iPad screen to reveal Control Center.
- Move your fingers across the screen to reveal the Control Center menu.
 Scroll across and click on the screen icon (farthest button on the right panel).
- Tap to choose to the stream content.
- Tap to choose the device you want to stream
- Tap to choose Apple TV
- Tap to choose Mirroring. You will see a blue bar appear at the top of the iPad screen when AirPlay mirroring is turned on.
Connecting through your computer
 If you already have a computer connected to your projector, you can simply turn it into an AirPlay receiver. Download an app such as AirServer, or X-Mirage to allow your MAC or PC to become the AirPlay receiver.
It will transmit what is on your iPad through to the projector and finally onto the screen. This can be a simple and quick solution, if you already have a set-up done. You can also connect iPad to a TV, projector, or other external display using the appropriate Apple cable or adapter. S
Tony Vincent has created a handy reference chart showing you seven ways to connect your iPads to projector.


